Littler Diecast Corp. produces aluminum alloy and high-strength ZA alloy diecastings in Albany, IN, and offers machining and finishing services that include deburring, precision grinding, powder coating, anodizing, and painting. Component assembly is offered, too. The company recently earned the North American Die Casting Assn.’s 2009 Safety Award, in recognition for Littler’s excellent safety record.
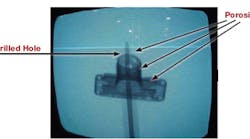
An x-ray revealed the nature and location of the defect in the original part.
Littler designs its own tooling, beginning with a process simulation using Flow Science Inc.’s Flow™ 3D simulation software, giving it the ability to predict casting results before starting production. Changes can be simulated to achieve customers’ design prior to completing final die design, for time and cost savings.
Littler designers also use CAD programs to help customers design components. In one notable case, Littler earned an aerospace customer’s order after it helped to develop a solution to a previous casting design problem. The customer had relied on a different supplier to produce electrical switch frames, but those high-pressure diecastings were plagued by problems with porosity, die erosion, and unsatisfactory die filling. The customer gave Littler an opportunity to locate the source of the defects, and to achieve a lower scrap rate.
X-rays showing different angles of the finished part sample, taken from the shop floor show, indicate no defects.
With no previous knowledge of the problems with the part design, or product defects, Littler used simulation with Flow-3D to pinpoint the defects. They discovered that porosity problems were happening in two locations in the switch — a finding that was confirmed later by the customer. Holes were forming in the plate and the chimney because of the way the die was filling.
In addition, Littler engineers found through the simulation that there was a large amount of die erosion around the slot for the lock washer and the sealing surfaces on the bottom of the plate. Also, overflows located at the corners of the part were not large enough to allow oxides and air to flow out of the die.
After being presented with these findings, the customer was so pleased to have the problems resolved that they reassigned the job to Littler Diecast Corp.
“Simulation quickly helped us understand how molten metal moved through the cavity and pointed the way toward the improvements needed to solve the problems,” explained Mark Littler. “The key to obtaining these benefits is accurate simulation and we have found that Flow-3D consistently delivers the accuracy we need to solve real-world problems.”
Using Flow-3D, Littler was able to analyze the flow behavior and visually determine that early solidification was occurring. In this small part, early solidification was happening due to the rapid cooling in the thin sections. Because the fluid jets across the part and back, it has more time to cool and trap air in the die. Littler Diecast determined that a better design would have the hottest liquid coming in last, and it was able to test a number of ideas to achieve this and finalize a design to minimize the problems.
Littler Diecast made three major design changes. First, they redesigned the gating and runner so the fluid entered through three gates in an entirely new direction.
Next, they created a larger overflow so that less back flow in the plate allowed the hottest fluid to enter last.
Finally, Littler altered the approach angle and locations of the gates, which helped prevent backflow in the chimney.
The new design also reduced the potential for die erosion. Now, fluid jets onto a core pin used for the center hole in the chimney. The core pin is easily replaced, which is much faster and less expensive than repairing the die steel.
All of the design changes took place before new die steel was cut, eliminating the costly process of re-engineering if problems had been discovered after the tooling was produced.
Following a production trial run, Littler Diecast verified the design changes through short shots, X-rays, and destructive tests. Short shots showed a balanced runner, and there was no porosity visible in the x-rays. Break testing showed a consistent crystalline grain structure with no voids, demonstrating that the failure was due to the strength of the material and not a casting defect. Now, the part could be cast with minimal scrap, saving the customer thousands of dollars.
